
It is essential to keep the home and office under surveillance, but monitoring them at a single location is impossible. With FreeIP for PC, you can observe the surveillance camera in real-time through the internet anywhere and anytime.

FreeIP is developed by jimquan for real-time monitoring and recording the surveillance camera. It can manage up to 16 cameras at a time. Since it is an Android app, it requires an Android Emulator for installing on PC. Let’s discuss the steps to install FreeIP for PC, Windows and Mac.
Related: ATCloud for PC – Windows / Mac Free Download
Features
User-Friendly Interface
The app has a simple and user-friendly interface to access all the features, and it has cloud storage to store all the live feed for future purposes.
Smart Viewing
It has PTZ (Pan Tilt Zoom) control for viewing everywhere in the room and also has VR 360 degree panoramic view. It allows instant recording and taking screenshots of the live feed.
Multi Screening
The app can add up to 16 camera devices and able to view 1, 4, 9, and also 16 cameras at a time. It has the Playback option to view the older feed, and you can also select the specific date footage with the calendar option. In the playback, you can also record and take snaps of videos.
Easy to Connect
It is very easy to connect the camera with three options, IP address, Serial number, and WiFi connection. Along with this, you have to enter the username and password of the device. You can name each device separately for easy identification.
How to install FreeIP for PC – Windows 7/8/10 and Mac
Step 1: Go to BlueStack’s official site (https://www.bluestacks.com) and download the installer file.

Step 2: Install the BlueStacks file and follow the on-screen instruction for launching BlueStacks on your PC.
Step 3: Search for the Google Play store and double-click on it to open. Sign in with your Gmail id and password.
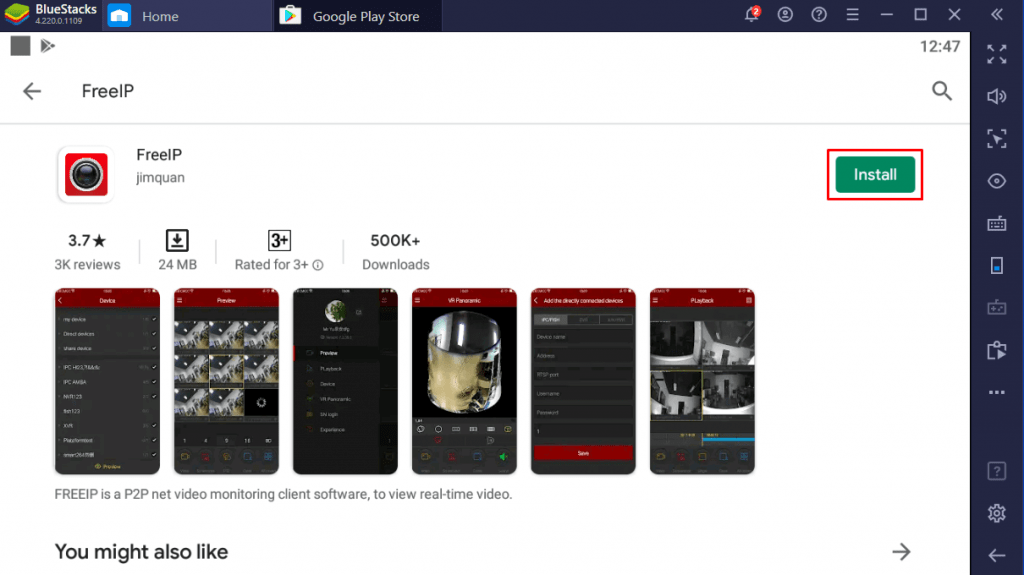
Step 4: Type FreeIP in the search bar and select the app from the below results.
Step 5: Select Install to download and install the app.
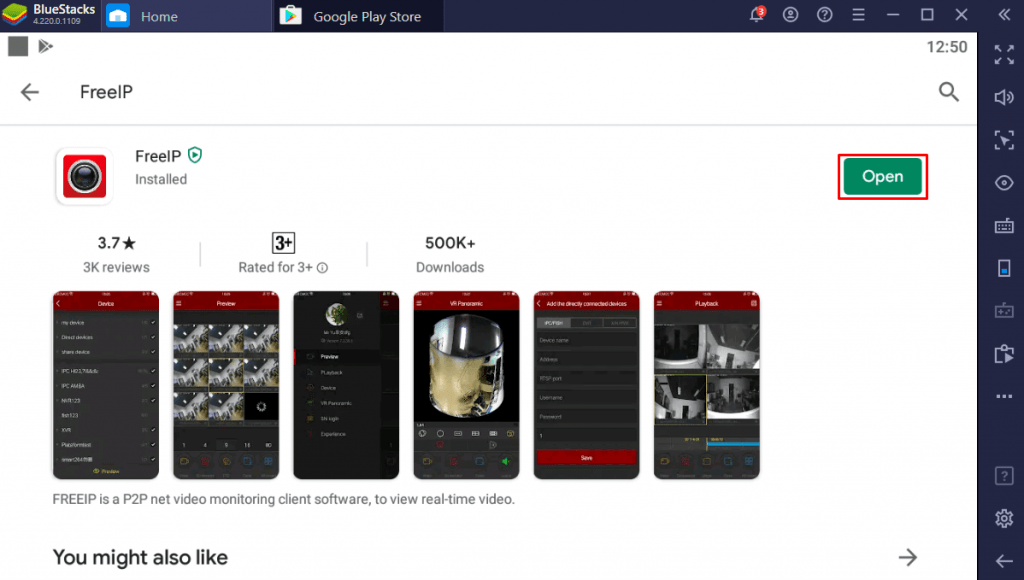
Step 6: After installation, select Open to launch the FreeIP app on Windows or Mac PC.
Monitor camera with FreeIP for PC
Step 1: Launch the FreeIP app by double-clicking on it. Select Agree on the next screen.
Step 2: Click Allow for the app to access the media files.
Step 3: Open the Devices tab from the menu and select Add Device to link the camera.
Step 4: Enter the device name, camera IP address, username, and password. Select Save to add the camera.
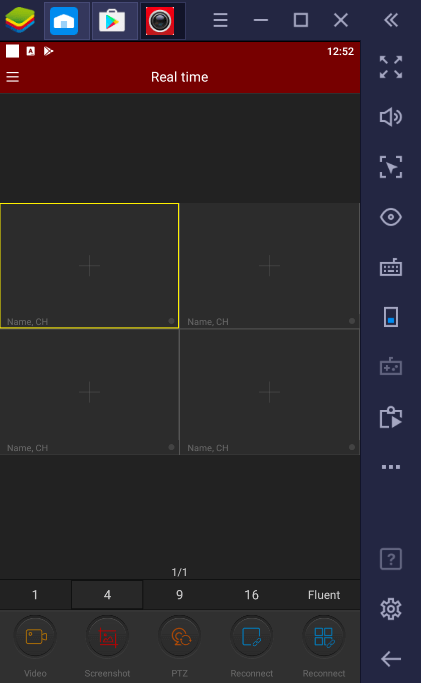
Step 5: Now, open the Real time tab to monitor the camera, record videos, take screenshots, control camera movement, switch between cameras, and view all cameras in a single view.
FAQs
1. How to add a camera in the FreeIP app?
You can add a camera in the FreeIP app in three ways – IP address, Serial number, and WiFi. It also requires the username and password for the connection.
2. How do I install FreeIP for PC?
Install FreeIP for Mac or Windows PC using an Android Emulator. Follow the above steps for easy installation.
3. How many cameras can be added to the FreeIP app?
You can add up to 16 cameras in the FreeIP app. You can also view 1, 4, 9, and also 16 cameras at a time.
4. Do I need Android Emulator for installing FreeIP on PC?
Yes. You need an Android Emulator to install FreeIP for your PC. Go through the above steps for installing the FreeIP app on PC using BlueStacks.
5. Can I view the previous day feed in FreeIP?
Viewing the previous day’s feed is possible in FreeIP with the Playback feature. You can select the required date in the calendar for viewing older footage.
FreeIP is the smartest app for safeguarding your properties through a surveillance camera. The unique feature of this app is the VR panoramic view. If you have any problem installing the FreeIP app, please do specify it in the comments section.